Three Bears Prints
Sunday, June 18, 2017
The Three Bears Prints Blog is Moving
Saturday, March 4, 2017
How to register Linocut Prints
 I've been asked a few times as to how I go about registering my linocut prints - that is, how do I line up each linocut representing a different colour? So I thought I would do a blog post on how I approach it. It does not follow a standard method - rather, it's what works for me. I tend to do linocut with only 2 or 3 colours, with contrasting colours in small limited areas, like this swallow.
 So I thought I'd start by showing my press and registration board. It's a proofing press, which is over 100 years old, and uses a rolling movement. My registration board is a thick piece of MDF. Along 2 sides, I have firmly fixed down 3 metal rulers which gives me a perfect right angle. I stick the paper I am going to be printing on to the rulers. I stick down the longest edge of the paper onto the ruler using low tack masking tape.
I start by cutting two pieces of mount card which will be large enough to hold my linocuts. I cut the corners of the card very precisely, so they are both perfect right angles which slot snugly into the right angle of the ruler.
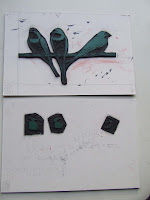
Here you can see the original swallow linocut in its entirety. I wanted to print this in a dark navy blue, and I needed a separate print plate with red lino pieces for the head areas. I consider the size of my mount card carefully. You need to make the mount card the same size as the piece of paper you want to print on, plus a margin where the paper will stick onto one of the rulers on the registration board.
Once you have stuck your main linocut onto the mount card, use a piece of tracing paper, and roughly trace the areas in contrasting colour which you will require. You can see here, you need to line up the right angle of the corner of the tracing paper up exactly with the right angle of the mount card.
Take your piece of tracing paper and attach it to the second piece of mount card in exactly the same way you had it laid out over your main linocut. I use scraps of lino and cut these roughly to shape and line them up under the area drawn on the tracing paper.
Draw round these scraps precisely. Using strong double sided sticky tape, stick them into place.
Take a print of your main linocut. As this is just a rough, I do this in water based inks which are easy to clean off, and in a colour which will show up well on the lino. Here you can see how I stick my paper onto the rulers.

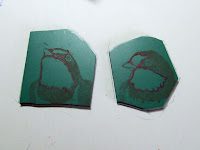
Take the second piece of mountcard and slot it into place on the press. Place the wet linocut print you've just taken over the mountcard. The print will transfer to these pieces of lino. Outline them in a sharpie marker. Cut them out.
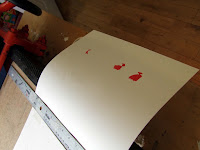 Here you can see the two different mount card plates for the navy and red colours of ink, and a print of the little red pieces. I always print my lighter colours first,as any mistakes will not be so obvious.
Here are the final prints hanging up to dry... and a copy of the print below. If you like it, you can buy it here on my website.
 |
| Swallows on Telephone Wire Linocut |
Thursday, March 31, 2016
Creating a Collograph
 |
| Drawings of carp |
 |
| Creating different carp plates for collograph |
After a holiday in Portugal where there was a beautiful carp pond at the place we stayed, I felt inspired to make a print of carp. I decided to create a collograph, as I wanted to capture the watery gloom of the pond and the fish swimming through these murky waters. I started off by drawing carp in different poses to capture the amazing shapes they make. I then made up plates of carp, using sheets of card, onto which I stuck pieces of bags that satsumas come in, and corrugated card.
 |
| Carp stuck onto foil covered mount card |
 |
| Detail of collograph plate |
 |
| Collograph plate inked in grey ink |
I then started to ink the plate. I used quite a loose (oil based) ink in grey to begin with. I forced this into all the areas of the plate with an old paintbrush. I wiped off the excess grey.
 |
| Collograph plate inked up in orange and blue |
Using a roller, I rolled a bright orange ink onto the fish so that some of the detail of the fish was highlighted. I rubbed a blue ink onto the rest of the plate using a cloth.
 |
| Inked collograph plate on press |
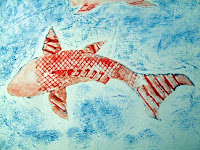
I put the inked plate through my press. I have a relief press rather than an etching press, which is not ideal. However, I still manage to get effective results by soaking thick heritage paper and then blotting it dry. I also experiment to get the optimum degree of packing.
 |
| Orange and blue ink on collograph |
 |
| Orange and green ink on collograph |
Here you can see three different versions of the inked up plate. It's really good fun trying different combinations of colours.
 |
| Deep pink and blue ink on collograph |
 |
| The final collograph print ink pink and green |
However, collograph prints do not come alive fully until you have coloured the background using a wash of water based inks. Here you can see my final print. The collograph was inked up using pink on the fish and a blue background - I then used a wash of light pink on the fish and green on the water.
 |
| Fabric available from Spoonflower |
Monday, January 11, 2016
Christmas Linocut - The linocutting process at high speed!
Just as an experiment, I decided to download an app (Lapse It Pro) to film the linocutting process using time lapse photography. As you sit in the one place for so long, the resulting films are not too bad! Here are the different stages of producing a linocut - in this case, my Christmas card for 2015, based on the 'Twelve Days of Christmas'.
1. Tracing your image
In the film below, you can see me tracing the image I created - this is the first stage of creating a linocut.
2. Transferring the image onto lino
Once you have traced your image, you flip over the tracing paper, and rub the image onto a piece of lino. It is very important that you go over the pencil lines with a permanent 'Sharpie' marker, otherwise you will wipe all your pencil lines off.
3. Cutting the lino
Here you can see me cutting out the partridge at the top of the design. Most of the work lies in cutting the lines to define the images - followed by clearing the areas around it. I also work on different areas to create pattern - in this case, the texture of the feathers. I use very sharp Swiss cutting tools for this part of the process.
4. Trimming the linocut
Many of my linocuts are a particular shape - in this case, a large pear. This is me working on the final parts of the image still to be cut out, followed by trimming the linocut with a craft knife. There is a starring role featuring my daughter who came to sit on my knee.
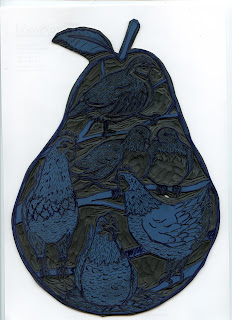
You can see below the final linocut - the lino itself is green, and the markings on it are from the Sharpie pen. In total, this linocut, which fits a piece of A4 paper, probably took 10 hours to produce including design, drawing and cutting time. For more information about my linocuts go to Three Bears Prints.
 |
| Partridge in a Pear Tree Linocut Print |
1. Tracing your image
In the film below, you can see me tracing the image I created - this is the first stage of creating a linocut.
2. Transferring the image onto lino
Once you have traced your image, you flip over the tracing paper, and rub the image onto a piece of lino. It is very important that you go over the pencil lines with a permanent 'Sharpie' marker, otherwise you will wipe all your pencil lines off.
3. Cutting the lino
Here you can see me cutting out the partridge at the top of the design. Most of the work lies in cutting the lines to define the images - followed by clearing the areas around it. I also work on different areas to create pattern - in this case, the texture of the feathers. I use very sharp Swiss cutting tools for this part of the process.
4. Trimming the linocut
Many of my linocuts are a particular shape - in this case, a large pear. This is me working on the final parts of the image still to be cut out, followed by trimming the linocut with a craft knife. There is a starring role featuring my daughter who came to sit on my knee.
5. The final linocut
 |
| The finished linocut in Japanese linoleum |
Friday, September 4, 2015
Hens Linocut Fabric Design
 |
| Fabrics based on my hen linocuts - buy them from Spoonflower |
As you can see, I've turned one of my favourite subjects for linocuts - hens - into fabric! Let me take this opportunity to show you the design process.
 |
| Paddling on the beautiful beaches; glorious hawthorn bushes; and cliff top view. |
We were staying in a holiday cottage, and the neighbours beside us had a small holding. They were very generous and let Estelle and I meet their chickens. These irresistible chickens became the subjects of my next set of linocuts!
 |
| Anglesey chickens! |
 |
| Four different hen linocuts |


I printed them up using red oil based inks, printing them onto both white rice paper or banana tissue paper.
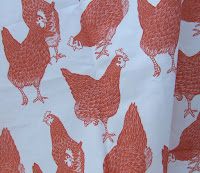
I scanned in the finished linocuts and used them to produce two different designs. You can see the two of the different designs and the two fabrics I created below.
 |
| Linocut of Hen in Red Ink |
 |
| Red Hen Cotton Fabric |
The red fabric stays most closely resembles the print of the original linocut with bright red hens on a plain white background. Click here to buy the linocut print. Order the fabric from here.
However, I also wanted to experiment with making the fabric design more complex. I developed another option - I changed the colouring to brown added more colour by tinting the beaks and legs. I added a background using banana tissue with feather designs on it. This background pattern helped draw the whole design together. I'm really delighted with this fabric - if you like it too, order it here! Prices from £5.50 for a fat quarter. If you'd like to buy this linocut print, click here.
 |
| Brown Hen Cotton Fabric |
Monday, August 17, 2015
Things of Beauty and Utility 4 - Railway Track Chest
 |
| Old Tuck Chest recovered in Railway Tracks Fabric |
 |
| A mess of railway track pieces |
I continue to do battle with Estelle's endless pile of toys - and this week, I declared war on the railway track pieces which were just shoved into the box they came in!
 |
| Old tuck chest destined for skip |
I decided to recover an old tuck chest which had been destined for the skip using my new railway track design fabric. I thought the silver edging would be a great contrast for my railway track design and would fit in with the theme perfectly.
 |
| Stiffen fabric and cut |
 |
| Trace shape of panel |
I then taped each of the sections over the appropriate part of the chest. I used a sharp pencil to trace out the lines of the silver edging. By pressing hard, I was able to trace the shape fairly accurately. In some sections (like the handle and lock) I had to slit the fabric - a bit like when you're wallpapering and you need to slit an area for the light switch.
 |
| Panels cut to size |
 |
| Slit cut for handle |
I used a piece of plastic to wedge the fabric under the silver edging.
 |
| The finished re-covered chest! |
Friday, August 7, 2015
Nappy Mat: Things of beauty and utility 3
 |
| Duckling fabric nappy mat |
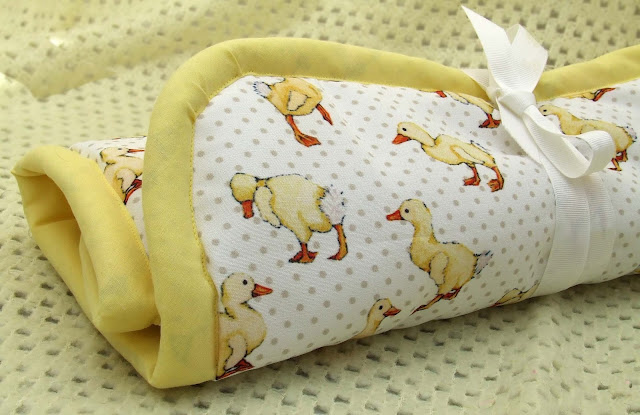
I've recently been designing my own fabric. I created this duckling fabric and decided to make a nappy mat - lots of people I know are having babies, so it's the perfect present!
Start by cutting out 3 pieces of fabric. The bottom layer is a wipe clean fabric - the middle layer is wadding - and the top layer is my duckling fabric. Make sure the fabric is washable! I made my own pattern by measuring out a piece of paper 60cm x 45cm and then used a saucer to round off the edges. Make each piece of fabric the same size.
 |
| Pin bias binding all round |
Pin the 3 pieces of fabric together by using bias binding. You can see here I chose yellow bias binding to tie in with the ducklings. I chose 2 inch wide bias binding. Pin bias binding all around the nappy mat -
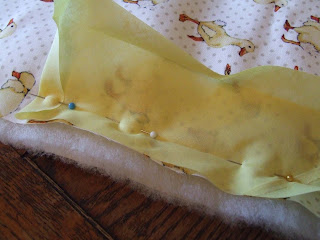
Below is a close up of how to pin the bias binding in place - unfold the bias binding and pin it along the edge of the nappy mat, matching the edges of your fabrics and the edges of the bias binding. Insert the ribbon which will be used to keep the nappy mat rolled up between the bias binding and the top layer of fabric. Sew along the line of the bias binding.
 |
| Insert ribbon bias and fabric |
 |
| Bias binding pinned in place |
Fold the bias binding over and pin it in place on the other side. You are really supposed to then stitch this by hand using a slip stitch so it is invisible, but I just very carefully top stitched it so it looked neat both from the front and the back. I also felt it made the nappy mat a bit stronger.
 |
| Top stitch in place from other side |
 |
| Ensure top stitching looks neat from both sides |
The finished nappy mat - they are very light and portable and make and ideal new baby present!
 |
| Finished nappy mat |
Subscribe to:
Comments (Atom)


