Showing posts with label how to linocut. Show all posts

Monday, January 11, 2016

Christmas Linocut - The linocutting process at high speed!

Just as an experiment, I decided to download an app (Lapse It Pro) to film the linocutting process using time lapse photography.  As you sit in the one place for so long, the resulting films are not too bad!  Here are the different stages of producing a linocut - in this case, my Christmas card for 2015, based on the 'Twelve Days of Christmas'.


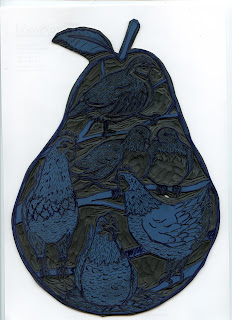
Partridge in a Pear Tree Linocut Print

1.  Tracing your image
In the film below, you can see me tracing the image I created - this is the first stage of creating a linocut.


2.  Transferring the image onto lino
Once you have traced your image, you flip over the tracing paper, and rub the image onto a piece of lino.  It is very important that you go over the pencil lines with a permanent 'Sharpie' marker, otherwise you will wipe all your pencil lines off.


3. Cutting the lino
Here you can see me cutting out the partridge at the top of the design.  Most of the work lies in cutting the lines to define the images - followed by clearing the areas around it.  I also work on different areas to create pattern - in this case, the texture of the feathers.  I use very sharp Swiss cutting tools for this part of the process.


4.  Trimming the linocut
Many of my linocuts are a particular shape - in this case, a large pear.  This is me working on the final parts of the image still to be cut out, followed by trimming the linocut with a craft knife.  There is a starring role featuring my daughter who came to sit on my knee.


5.  The final linocut
You can see below the final linocut - the lino itself is green, and the markings on it are from the Sharpie pen.  In total, this linocut, which fits a piece of A4 paper, probably took 10 hours to produce including design, drawing and cutting time.  For more information about my linocuts go to Three Bears Prints.


Example of a linocut in Japanese linoleum
The finished linocut in Japanese linoleum

Saturday, March 7, 2015

Two Colour Eider Duck Linocut

Eider duck linocut
Eider duck linocut
I've just finished printing an edition of eider ducks linocut prints.  They were inspired by the eider ducks we saw while on holiday in Gardenstown.
Gardenstown is a beautiful village up in the North East of Scotland.  It's a fishing village built right on the sea.  It's a perfect place to visit as a family as it's almost car free and the beach is practically at your front door!  Lots of seabirds live there, including a population of eider ducks.

Gardenstown is built right on the sea!
Gardenstown is built right on the sea
Gardenstown harbour
Gardenstown harbour


gannet colony
There is a large gannet colony nearby
MacDuff Aquarium
At the MacDuff Aquarium


I decided to produce a simple two colour linocut.  I love the technical challenge of reducing what you would like to portray down to 4 colours: the colour of the paper; the 2 colours of each separate linocut panel; and the 4th colour where the panels overlap.

First panel inked up in black


 1.  Here you can see my first linocut panel, which is printed up in black.


Second panel inked up in blue


2.  I made a second panel, which I printed up in a grey-green blue.  You can see clearly in this photograph the overlap of colours, where there are ripples on the water.


3.  The edition of eider ducks prints drying off on the rack.  They are printed on to very beautiful but very fragile rice paper, so you need to stretch them out carefully.

Eider duck prints drying off


Wednesday, May 21, 2014

Texture in Linocuts

It is important to make use of texture in linocuts, especially if it is a one colour linocut.  Texture adds interest and realism.  You can create texture by using different sized tools.  All of my Calendar of Scottish Wildlife prints make use of texture to make the animals more life-like.  In the bats example below, you can see I’ve used a small tool to create the fur; and a broader tool for the grain of the wood.

Texture adds realism to this linocut of bats

The amount of texture you add can lead to a variation of shades of colour, and this can help to differentiate between areas. Look at the ‘Sleeping Rabbits’ print below which incorporates three different shaded areas. 

1.  The light hay, where only the thinnest lines have been left behind. 
2.  The mid tone rabbits where a thin tool has been used to create lots of short lines to give the impression of fur. 
3.  Finally, there is the almost solid, very dark earth, where the only texture is the occasional stone.


Variation in texture creates different shades of the same colour
Variation in texture creates different shades of the same colour in this rabbit linocut
In creating texture, it is important not to over cut and clear out too much.  With my 2011 Christmas Bears card below, for example, I feel I was a bit over zealous in creating lines for the fur of Mummy Bear – I think she looks a bit bald compared to the others!

Do not remove too much lino when linocutting
Be careful not to remove too much - poor balding Mummy Bear!
In creating a colour linocut, it is also important to add texture.  It can make a single area of colour lighter or darker, helping to describe the surface area and solidity of the subject.  Look at the grey section of the gannets below.  The solid grey in the beaks show how strong they are.  The textured grey highlights their feather and changes into a solid grey, to show the shaded areas.

Texture in the grey area shows the feathers of the gannets.
Texture in the grey area shows the feathers in this gannet linocut.
Enjoy using your tools to create different textured effects in your linocuts!

Saturday, May 17, 2014

How to make a repeat pattern

In this post, I want to show how I create a linocut which can be put together to form a repeat pattern.  This kind of linocut needs to work in design terms both on it's own, or as part of a repeat pattern. I'm going to go through the design process for the first ever repeat pattern I produced, my dachshunds.

Dachsund linocut - repeat pattern

1.  Firstly, you have to choose the element(s) which will form the corners and edges of your linocut.  You will be cutting these into 4, so you will need to think about how these will look once they have been cut into sections.  Do you want the sections to look fairly abstract or still recognisable?  For me, this is the best bit of creating a repeat pattern – the challenge of cutting your subject matter up and making decisions as to how you want these parts to look.  Here's the dachshund which will form my corners.

Decide on image which will form borders and corners
Step 1 - Decide on image which will form borders and corners


2.  Cut it into four.
Step 2 - Cut into four


3.  Label them.
Step 3 - Label the sections


4.  Arrange these quarters as shown.  It is important that they are laid out in this sequence so they match up when the final print is grouped with other prints, they match up.

Step 4 - Arrange the sections into corners/edges


5.  Compose the remainder of your linocut around these corner and edge elements.  


Step 5 - Design the rest of your linocut around these sections


6.  Make sure the linocut looks balanced, both as a single piece and as a repeat pattern.  To do this, you will need to be aware of the amount of background space in your print.

Single dachshund linocut print


Dachshund linocut print as repeat pattern

Here is the same process for the hen design I created for Gloagburn Farm.


Step 1 - Drawings of hens which will form edges

1.  I started with drawings of the two hens I knew I wanted to cut up to form the edges of the design.

Step 2 - Hens cut into sections and placed along edges


2.  I cut these into sections and moved these into the correct place.  I wanted to make them look a bit more natural than the dachshunds, as though it was a cross section of a flock of chickens, so I placed them along the edges rather than quartering them and putting them in the corners.

Step 3 - Filling in the rest of the hen design

 3.  I created the rest of the design around these elements.  I tried to show the hens in a variety of poses, and made sure that their sizes were consistent.

Single hen linocut print

4.  The finished linocut as a single print.  Again, you have to be aware of the solid areas and the unfilled background, both as a single print....

Hen linocut print as repeat pattern


5.  ...and as a repeat.  You need to make sure it works both as a single print and as a repeat pattern.


Hope you enjoy experimenting with repeat patterns!


Sunday, March 24, 2013

How to Make a Linocut

This post will give you instructions on how to make a linocut - I'll show you step by step how I produced my 'Rabbits at Home' linocut.   Happy linocutting!

Rabbit Linocut


1.     Sketch out your design.  Take into account practical matters, such as the dimensions of your paper – the rabbits, for example, are standard postcard size.  Be mindful of contrasting black and white areas, and textured versus plain areas.  Try to achieve a good balance between these.
2. Tracing. Trace your design using a dark pencil.


3. Transfer your design. Turn the tracing paper over and place it onto your lino. Tape your lino into place with masking tape to ensure nothing shifts while you’re transferring it. If it shifts, you will never be able to match it up again.


4. Highlight your Design. Go over your pencil lines with a waterproof marker such as a ‘Sharpie’ marker.


5. How to Cut. The important thing to remember is that that the areas your remove from the lino will not print. What you leave behind will be printed up. This means that you have to think in reverse. Be very careful not to over-cut and remove too much lino. This makes it flat and uninteresting. Also, avoid cutting through any important inter-connecting lines. On the finished print, you’ll see that I accidentally cut off one of the sleeping rabbit’s ears where it joins onto the head!


6.  Cut out your Design.  Cut out the main subject first.  Carefully go round the outside and inside lines of the design first.  Then cut out the inner part, creating texture and contrast as you go.  Use small tools on detailed areas, larger tools to clear large parts.


7.  Check your Progress.  One useful way of checking your progress is to use a bingo marker.  Colour the area you have just been cutting, lay a scrap sheet of paper on top, and take rubbing with an old spoon or your fist.


8.  Prepare your Inks.  With your design cut out, you’re now ready to print!  Prepare your inks.  Make sure you have enough of the colour you are using for the size of your print run.  Roll out a thin film of ink.


9.  Ink up your lino.  Roll the roller through the film of ink one way until it is loaded with ink.  Roll it onto the lino one way.  Make sure the lino has a thin sticky film of ink all over it.


10. Print your Linocut.  If using a press:  slot your lino into place on a registration board.  Carefully lay your paper over the lino.  Place packing materials (such as newspaper and card) on top and roll the press over.  You may need to experiment until you get the pressure correct.  If hand-printing:  slot your lino into place on a registration board and carefully lay your paper over the lino.  Burnish it by rubbing the back of the paper with a spoon.


11. The Great Reveal.  It’s time for the great reveal!  Slowly lift the paper up from one corner.  If the ink is patchy, carefully replace the paper and have another go with the press/spoon.


12. Blot Print.  Using tissue or scrap paper, blot the print to remove any excess ink.  Hang it up to dry.  Edition your prints.  If you print 10, number each one as being a series of 10 – e.g. 1/10, 2/10…10/10.


13. THE FINISHED PRINT!  Ta da .....

Finished 'Rabbits at Home' linocut


Monday, January 14, 2013

Tour of my Tool Kit

My tool kit is brilliant!  It was a gift from Mum and Dad is one of the best presents I've ever been given.  It was made by Scott Exeley Leathers out at Arthurstone near Meigle.  It's very cleverly designed, with a slot for each tool, and rolls up neatly.  It protects my tools, and when each slot is full, I am confident I have everything with me I need to create a linocut.


You can buy a very cheap lino cutting handle and individual tool heads you can screw into the handle - such as the red handled tool below.  However, I would strongly recommend buying 'Swiss cutting tools' - the wooden handled tools below - available from Intaglio Printmakers.  I have been amazed at the range of cuts you can make every time I’ve bought a new tool.It’s very true that a crafts person is only as good as their tools.


Once you’ve bought your tools, you also need to buy a leather strop and some honing paste to keep your tools sharp.  It’s really important to sharpen your tools every time before you start cutting and about once an hour while you’re creating your lino cut.


I keep other equipment in my tool kit - tools for cutting, and pencils and pens for laying out the designs.


If you're interested in doing a workshop or seeing my prints, have a look at http://www.threebearsprints.com/ or https://www.etsy.com/uk/shop/ThreeBearsPrints?ref=si_shop.

Sunday, January 13, 2013

The Double Line Technique

You can also use what I call the ‘double line’ technique. This is where you use your tool to draw an inner outline to a shape. This helps to delineate and emphasise the features and structure of the shape. 

In a Christmas card I produced of Max, our black Patterdale terrier, you can see the use of this technique clearly .  Below is the both the linocut and a print of the whole card.


Linocut of Christmas Patterdale card
Print of Linocut of Christmas Patterdale
Let's take a closer look at the double line technique by focusing on the panel of Max and Santa looking at each other.  On the right, you can see how this linocut would have looked if I’d just used a single line to render his features.  To me this version looks flat, boring and too simple.  The version on the left is much more clearly delineated.


The same panel, but comparing the use of the single and 'double line' technique.
This is an especially useful technique as it means you can add detail and shape to an otherwise solid coloured area. You need to be aware of the overall, outer shape of the area and the inner shapes which you need to outline which make up this area.


Fragmented Santa!  The continuous line around his body has been broken up.
Make sure your inner lines do not breach your outer line at all.  Keep them at least 1-2mm away from the edge of the shape.  If you take them right to the edge, you will fragment your linocut into little bits, and you will lose the sense and structure of what you are trying to illustrate. Look at Santa above - I've extended all the internal lines and broken through his outline. This has separated the different parts of his body and they now appear to be floating about!

Like to see some Christmas Art Prints for sale?  Have a look at:
https://www.etsy.com/uk/listing/113758489/mice-decorating-christmas-tree
https://www.etsy.com/uk/listing/169879100/christmas-mouse-art-archival-digital?ref=shop_home_feat
https://www.etsy.com/uk/listing/169890653/christmas-bear-art-archival-digital?ref=shop_home_feat