Monday, March 2, 2015

Beautiful Things of Utility! Part 1 - Printed, drawstring bags

Over the last few weeks, I've been using the excuse of tidying up Estelle's room to make different things which are both beautiful and useful!  Below you can see the drawstring bags I've been making by printing on fabric.


Drawstring bags
Drawstring bags using some of my illustrations
Duckling drawstring bag
Details of the duckling design
Duckling drawstring bag reverse
Reverse side of the duckling bag

Panda bag
Close up of panda bag.

Dachshund drawstring bag
I would like to show you how to make the dachshund drawstring bag shown here on your left.  

I am going to show you how I print onto fabric using a computer printer - but please note, if you would like to do this, you are doing this at your own risk!

All of the illustrations you see here are available to buy through the Three Bears Prints Etsy shop.  Here's the link to my shop:
Three Bears Prints Etsy Shop
You can find the panda, ducklings and dachshunds in this section of my shop.


Apply spray mount onto card
1.  Spray mount onto card.

1.  First of all, you will need to work out your design and the measurements for your bag. I use Photoshop.

I used Photoshop to come up with an oblong dachshund design measuring 16cm x 48cm.  The measurements of my canvas was 26 x 64cm so that I had lots of space for seam allowances.

I cut a piece of card measuring 26 x 64cm.  (I am lucky enough to have a printer which can up to 32 x 67cm.)

I put newsprint down to protect my table, and applied spray mount to the whole of the piece of card.


Smooth fabric over sticky card.
2.  Smooth fabric over sticky card.
2.  Cut your fabric (and use fabric which is fairly thin) a little bigger than your card.  Iron it then carefully smooth it over the card.


 Perfectly smooth surface.
4.  Perfectly smooth surface.
Trim fabric
3.  Trim fabric.
3.  Use a metal rule and very sharp craft knife to trim the fabric.


4.  This produces a flat, perfectly trimmed surface on which to print.


Printing the fabric
5.  Printing the fabric
5.  You can now print your design.  Make sure you set up the print options correctly - so for me, I have to choose custom print and put in the size of the card, and set it to 'high quality' printing.  

Depending on what I'm printing, I will also increase the contrast, and decrease the brightness of a design, to compensate for the light fabric.

Carefully feed the fabric cover card in, and watch it as it feeds through the printer, to make sure it doesn't jam.


Close up of printed fabric
6.  Close up of printed dachsies


6.  You can see that you can print really high quality, detailed images!
At this point, I would waterproof my fabric by spraying the same protector on them such as you would use to protect canvas bags and shoes.


I'm a fairly novice sewer, but drawstring bags are easy.  I looked at this blog post for some instructions:
http://notesfromthekitchentable.com/2013/01/30/how-to-make-a-drawstring-bag/ 

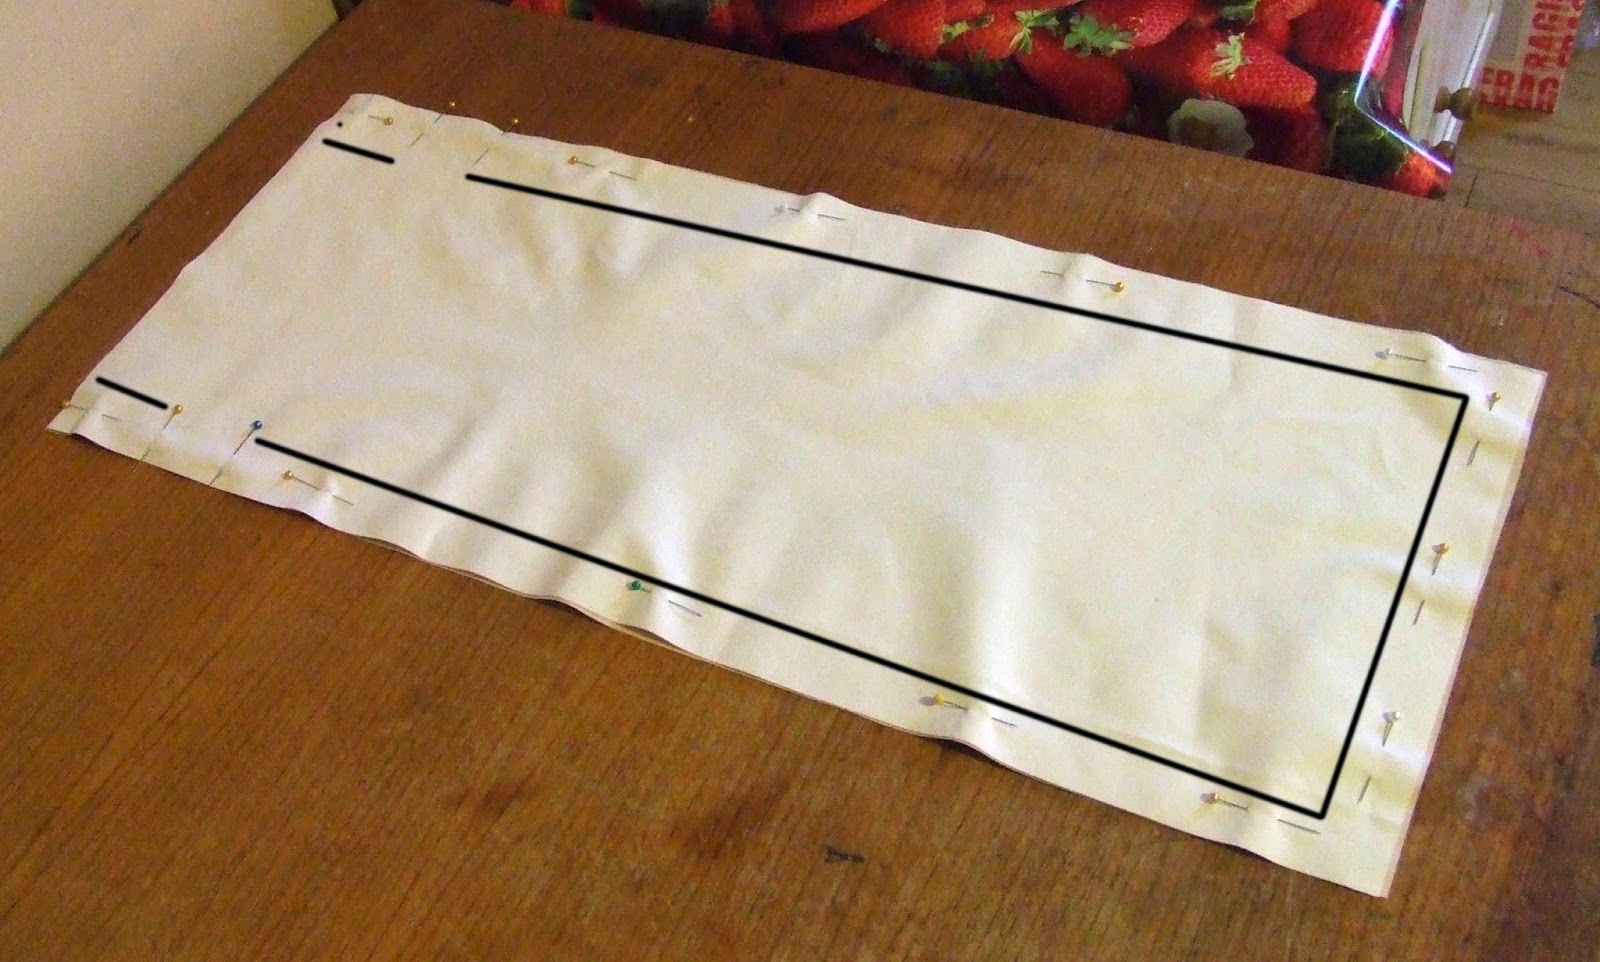
To summarise, you sew the edges, leaving a gap where the string (or in my case, ribbon) will go...
Sew round hole for string

Sew the edges of the bag leaving gap for string


...then you open up the edges and sew around the hole for the string...


Create channel for string
Thread through string
Thread through string - or ribbon
....turn over the top of bag to create channel for the ribbon... turn it the right way, and using a large safety pin, thread through the ribbon.


dachshund drawstring bag
The finished dachshund drawstring bag!


Saturday, September 27, 2014

Dragonfly Collograph Print

Dragonfly Collograph


I've been wanting to experiment with creating collographs for a while using my press, and I decided to make a dragonfly themed collograph as I thought this would be a good opportunity to experiment with different textures on a watery background.  I've only ever made one collograph before, and certainly not this complicated, so I really was feeling my way with this.  I'm in no way an expert!  But I'm really delighted with how it turned out...
here's a detail of part of the collograph.

Dragonfly Print
Part of Dragonfly Collograph

So here's how I did it:

Dragonfly Print
1.  Laying out the background reeds

I started off by cutting a piece of mount board to size.  I gathered some dried reeds to make the background.  I stuck them to the mount board with lots of Marvin Medium.

Dragonfly Print
2.  Creating the dragonflies
As you can see, I decided to make the dragonflies out of pieces of card, with textured paper for the eyes, and lace fabric for the wings.

Dragonfly Collograph
3.  Board painted white
Once everything was in place, I coated it with 2 layers of Marvin Medium to make sure everything was stuck down firmly, and then painted it white so I would be able to see the inks better.
Dragonfly Print
4.  Inked up plate
Dragonfly Collograph
5.  Close up of inked plate

Above you can see the plate once it had been inked up.  I used two colours to ink it up, using oil based inks.  I used a grey ink, which I firmly rubbed into all the details using a scrap cloth.  I then wiped off the excess, and used a blue colour over the plate.  

Dragonfly Collograph
6.  Inked up paper
Above you can see how this turned out - you can see the layers of grey and blue.  Below, you can see that I  also experimented with using a paint brush to paint in the dragonflies bodies' in pink.  I decided I preferred the simpler blue and grey version.

Dragonfly Collograph
7.  Inked up paper with pink

So far, pretty unimpressive....but the results are TRANSFORMED when you paint up the inked paper with water soluble inks.  As you can see from the finished print below, the oil based inks show through the water based inks,  The finished print is rich in texture and the colours really sing.  I'm delighted with the detail of the reeds and the wings of the dragonflies.  I'll definitely be experimenting further with collographs!


Dragonfly Collograph
8.  The finished dragonfly collograph print

If you'd like to buy download versions of this print, have a look at my Etsy shop on:
http://etsy.me/1wVdk8a.

Wednesday, May 21, 2014

Texture in Linocuts

It is important to make use of texture in linocuts, especially if it is a one colour linocut.  Texture adds interest and realism.  You can create texture by using different sized tools.  All of my Calendar of Scottish Wildlife prints make use of texture to make the animals more life-like.  In the bats example below, you can see I’ve used a small tool to create the fur; and a broader tool for the grain of the wood.

Texture adds realism to this linocut of bats

The amount of texture you add can lead to a variation of shades of colour, and this can help to differentiate between areas. Look at the ‘Sleeping Rabbits’ print below which incorporates three different shaded areas. 

1.  The light hay, where only the thinnest lines have been left behind. 
2.  The mid tone rabbits where a thin tool has been used to create lots of short lines to give the impression of fur. 
3.  Finally, there is the almost solid, very dark earth, where the only texture is the occasional stone.


Variation in texture creates different shades of the same colour
Variation in texture creates different shades of the same colour in this rabbit linocut
In creating texture, it is important not to over cut and clear out too much.  With my 2011 Christmas Bears card below, for example, I feel I was a bit over zealous in creating lines for the fur of Mummy Bear – I think she looks a bit bald compared to the others!

Do not remove too much lino when linocutting
Be careful not to remove too much - poor balding Mummy Bear!
In creating a colour linocut, it is also important to add texture.  It can make a single area of colour lighter or darker, helping to describe the surface area and solidity of the subject.  Look at the grey section of the gannets below.  The solid grey in the beaks show how strong they are.  The textured grey highlights their feather and changes into a solid grey, to show the shaded areas.

Texture in the grey area shows the feathers of the gannets.
Texture in the grey area shows the feathers in this gannet linocut.
Enjoy using your tools to create different textured effects in your linocuts!

Saturday, May 17, 2014

How to make a repeat pattern

In this post, I want to show how I create a linocut which can be put together to form a repeat pattern.  This kind of linocut needs to work in design terms both on it's own, or as part of a repeat pattern. I'm going to go through the design process for the first ever repeat pattern I produced, my dachshunds.

Dachsund linocut - repeat pattern

1.  Firstly, you have to choose the element(s) which will form the corners and edges of your linocut.  You will be cutting these into 4, so you will need to think about how these will look once they have been cut into sections.  Do you want the sections to look fairly abstract or still recognisable?  For me, this is the best bit of creating a repeat pattern – the challenge of cutting your subject matter up and making decisions as to how you want these parts to look.  Here's the dachshund which will form my corners.

Decide on image which will form borders and corners
Step 1 - Decide on image which will form borders and corners


2.  Cut it into four.
Step 2 - Cut into four


3.  Label them.
Step 3 - Label the sections


4.  Arrange these quarters as shown.  It is important that they are laid out in this sequence so they match up when the final print is grouped with other prints, they match up.

Step 4 - Arrange the sections into corners/edges


5.  Compose the remainder of your linocut around these corner and edge elements.  


Step 5 - Design the rest of your linocut around these sections


6.  Make sure the linocut looks balanced, both as a single piece and as a repeat pattern.  To do this, you will need to be aware of the amount of background space in your print.

Single dachshund linocut print


Dachshund linocut print as repeat pattern

Here is the same process for the hen design I created for Gloagburn Farm.


Step 1 - Drawings of hens which will form edges

1.  I started with drawings of the two hens I knew I wanted to cut up to form the edges of the design.

Step 2 - Hens cut into sections and placed along edges


2.  I cut these into sections and moved these into the correct place.  I wanted to make them look a bit more natural than the dachshunds, as though it was a cross section of a flock of chickens, so I placed them along the edges rather than quartering them and putting them in the corners.

Step 3 - Filling in the rest of the hen design

 3.  I created the rest of the design around these elements.  I tried to show the hens in a variety of poses, and made sure that their sizes were consistent.

Single hen linocut print

4.  The finished linocut as a single print.  Again, you have to be aware of the solid areas and the unfilled background, both as a single print....

Hen linocut print as repeat pattern


5.  ...and as a repeat.  You need to make sure it works both as a single print and as a repeat pattern.


Hope you enjoy experimenting with repeat patterns!


Monday, November 25, 2013

Composition and Layout.

When you are making decisions about the layout and composition of your linocut, you need to think about:
  • solid or textured areas vs the background of the paper
  • the line technique you will use
  • the shape of your subject matter.
Christmas Tree Mice
The composition of the christmas card above is one I am very pleased with for the following reasons.

Solid or textured areas vs the background of the paper:  There is a good balance between the blank areas of the paper, the solid green of the christmas tree, and textured areas of the mice, woven through by the detailed snowflakes.

The line technique you will use:  A range of line techniques have been used.  All the mice have been outlined using the 'double line' technique.  Both the tree and the snowflakes have been cut out very simply, using a single line.

The shape of your subject matter:  In composing this linocut, I made sure each of the mice were in different poses and carrying out different activities.  The snowflake chain loops round the tree, making the tree more 3D, but also serves to link up the 4 mice.  The traingular shape of the tree is pleasing to the eye and provides the perfect backdrop to the mice.

If you would like to buy this print, have a look at:
https://www.etsy.com/uk/listing/113758489/mice-decorating-christmas-tree.

Monday, April 8, 2013

Chine de Colle Technique

Chine de Colle is a technique which involves sandwiching coloured paper between the ink and the paper on which you’re printing.  My students have experimented with this technique much more than I have, so with their permission, I will be making reference to their prints.
Below, you can see Sophie’s design of her cat Milo.  Making his eyes yellow brings life and energy to the print. 
Karen also makes extensive use of the Chine de Colle design.  She had the brilliant idea of using cut outs from magazines to provide not only colour but texture to her prints.  In the print below, she has kept the lines of her linocut  very light and delicate; and used a cut out of flowers from a magazine to emphasise the body of the bird and imitate its feathers. 

Jennifer created a lovely series of butterfly cards using the chine de colle technique.  Here she has used origami paper for the wings, creating a beautiful image, with the patterned orange wings contrasting perfectly with the deep blue of the ink.


Ruthie, a 10 year old linocutter, has experimented very successfully with this technique.  She created a linocut of a sheep with a large ‘blank’ area in the middle.  She then used origami paper to produce a multi coloured herd of sheep,  which have a real impact when framed together.
Here’s how to do it.
1.  Use a draft print of the linocut to produce a template for the area you want to be covered with coloured paper.  In this case it is the body of the sheep.  Cut out the piece of paper to the shape required.  Patterned paper works better if your linocut is quite simple.  Plain coloured paper works well in drawing attention to a particular part of the linocut.
2.  Ink up your linocut. 
3.  Place the coloured paper front side down onto the inked up lino.  Being careful not to shift the paper, put a few dots of glue on the back.
4.  Put the paper you are printing onto over the linocut and transfer the print as usual, either using a press or by burnishing it.  Carefully life the paper off the linocut.


 If you are interested in doing a workshop with Three Bears Prints, have a look at :
http://www.threebearsprints.com/workshops